Introduction
No post de hoje, eu gostaria de demonstrar a vocês como arquivar tabelas históricas no Azure com o Stretch Database, disponível a partir do SQL Server 2016. O Stretch Database é um recurso do SGBD, que migra seus dados frios (aqueles dados que não são alterados e nem consultados com frequência) de forma automática, transparente e segura para a nuvem do Microsoft Azure, pois os dados são armazenados de forma criptografada no Azure (utilizando o Always Encrypted) e permitem que você possa acessar os dados frios (no Azure) e os dados quentes (locais) de forma transparente para a aplicação, ou seja, todo o processo é feito pelo Database Engine, de forma totalmente transparente, onde na mesma consulta, você poderá estar consultando dados na nuvem e locais sem nem mesmo perceber isso.
Entre as vantagens de se utilizar o Stretch Database, está a redução do consumo de espaço em disco local, nos dados quentes, uma vez que os dados históricos (que costumam ser o maior volume de dados) foram movidos para a nuvem. Isso garante também, uma consulta mais rápida nos dados quentes (menos páginas para processar) e facilita a manutenção desses dados, uma vez que os backups serão realizados de forma mais rápida, assim como diversas outras tarefas administrativas, como rebuild de índices, checkdb, etc.
Como funciona o Stretch Database
Depois de habilitar o Stretch Database para uma instância do SQL Server e um banco de dados, e selecionar pelo menos uma tabela, ele começa silenciosamente a migrar os dados frios para o Azure.
- Se você armazenar dados frios em uma tabela separada, poderá migrar a tabela inteira.
- Se a tabela contiver dados quentes e frios, será possível especificar uma função de filtro para selecionar as linhas a serem migradas.
- Você não precisa alterar as consultas e os aplicativos cliente existentes. Você continua a ter acesso direto aos dados locais e remotos, mesmo durante a migração de dados. Há uma pequena quantidade de latência para consultas remotas, mas você só poderá ser afetado por essa latência ao consultar os dados frios, que estão no Azure.
- O Stretch Database garante que nenhum dado será perdido caso ocorra uma falha durante a migração. Ele também possui uma lógica de repetição para tratar de problemas de conexão que podem ocorrer durante a migração. A DMV sys.dm_db_rda_migration_status fornece o status atual da migração dos dados.
- Você pode pausar a migração de dados para solucionar problemas no servidor local ou para maximizar a largura de banda de rede disponível.
Para você ter certeza que os dados estão realmente armazenados na nuvem, podemos utilizar a sp_spaceused para identificar quantas linhas e o volume de dados que existem na tabela, permitindo filtrar também, os dados que estão locais e os que estão remotos:

Como implementar o Stretch Database utilizando o SSMS
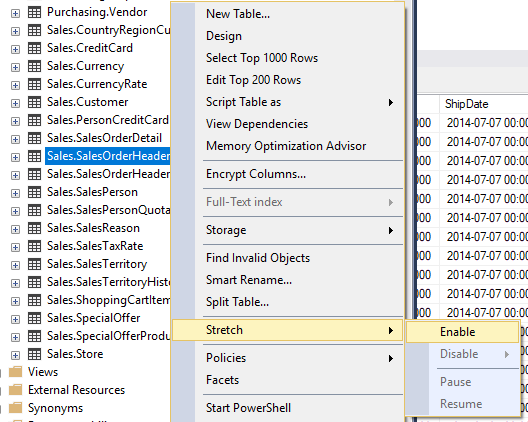
Visualizar conteúdoO primeiro passo, é selecionar a tabela que você gostaria de armazenar na nuvem através do “Object Explorer”, clicar com o botão direito e selecionar o menu “Stretch Database” e clicar na opção “Enable”.
A primeira tela do Wizard do Stretch Database exibe um resumo de como será a configuração desse recurso.

Caso a sua tabela possua algum recurso que seja uma limitação do Stretch Database, você irá se deparar com essa tela.
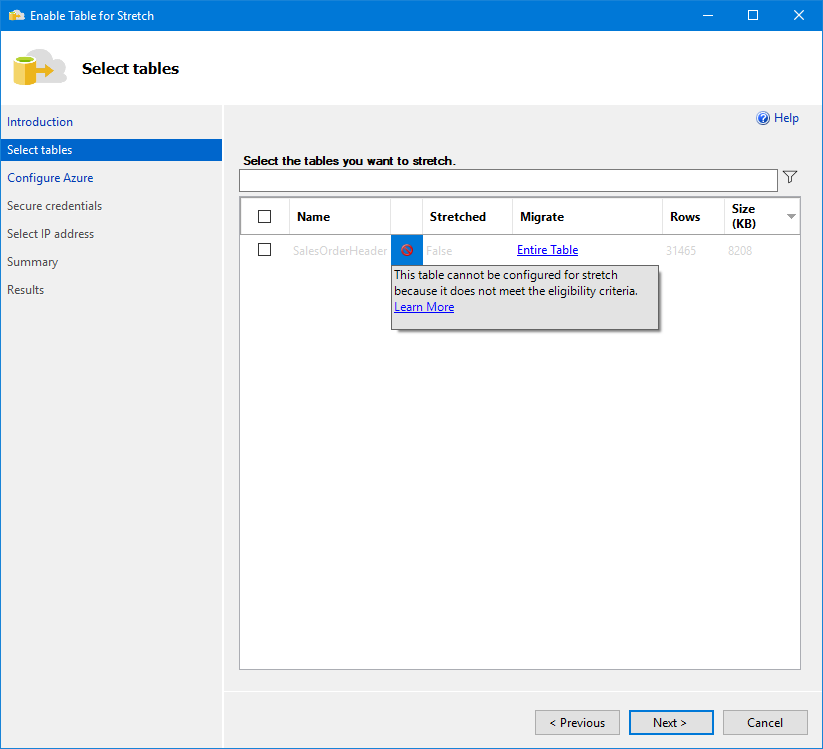
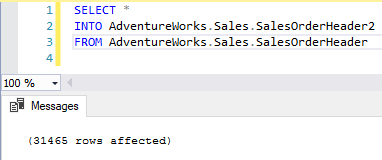
No caso da tabela SalesOrderHeader, as limitações que estão impedindo o uso do Stretch Database são constraints de check, default e foreign keys. Para contornar isso, vou criar uma nova tabela (SalesOrderHeader2) com o conteúdo da tabela original (SalesOrderHeader), mas sem as contraints.
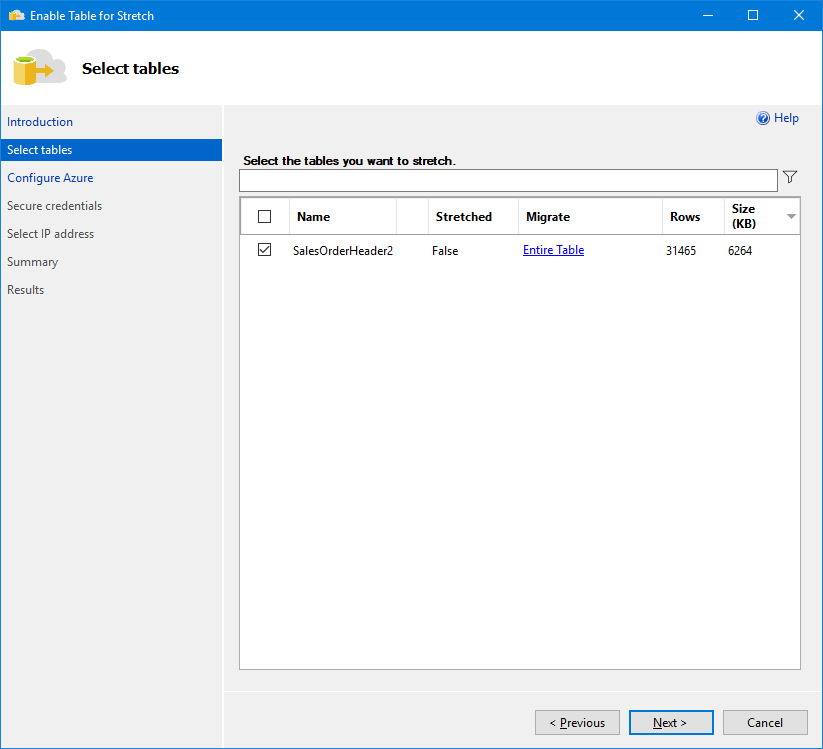
Agora, vamos tentar ativar o Stretch Database na nova tabela recém criada. Reparem que a opção padrão é “Entire Table”, ou seja, toda a tabela será armazenada na nuvem. Caso você queira manter uma parte dos dados na infra local, até para ter uma performance melhor nas consultas mais frequentes, clique nesse link para abrir a tela de configuração da migração para a nuvem.
Caso você queira personalizar a forma de identificar os dados “frios” (dados pouco usados – armazenados na nuvem) e dados “quentes” (dados usados com frequência – armazenados na infra local), você pode selecionar a opção “Choose Rows”, definir um nome para esse filtro e escolher a coluna e a expressão que será utilizada para filtrar os dados, conforme exemplo abaixo:
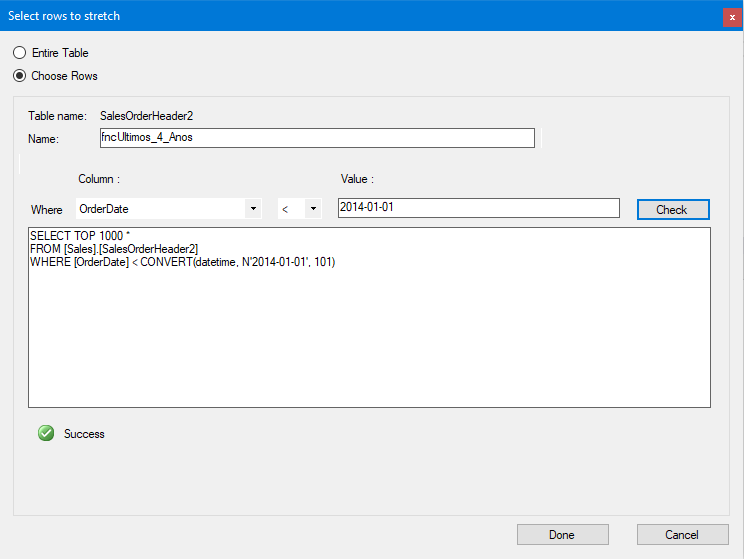
E assim fica a tela de configuração do Stretch Database após criar um filtro para selecionar as linhas que serão migradas:

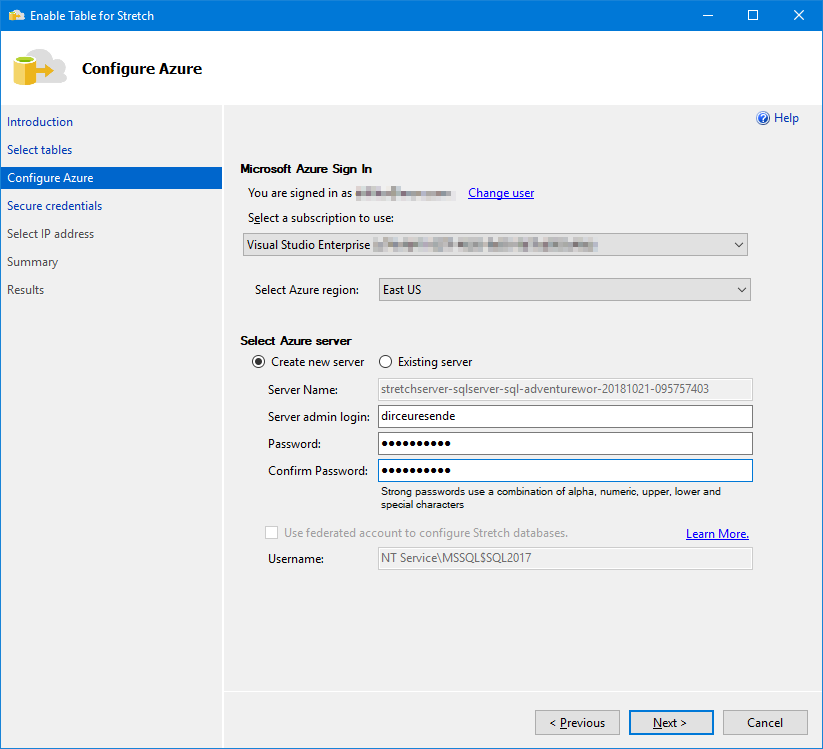
Nesta tela, devemos configurar a conta do Azure que irá armazenar os dados “frios” da tabela de origem.
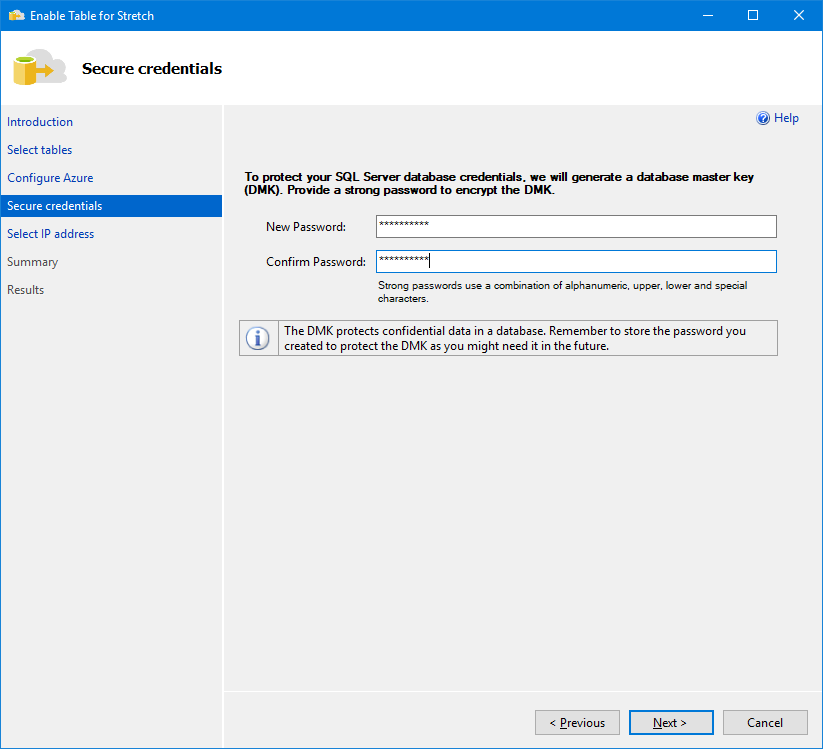
Já nesta tela, vamos configurar uma senha forte para a master key (DMK) do banco de dados, que será utilizada para criptografar os dados na nuvem (utilizando Always Encrypted, tudo de forma transparente para você)
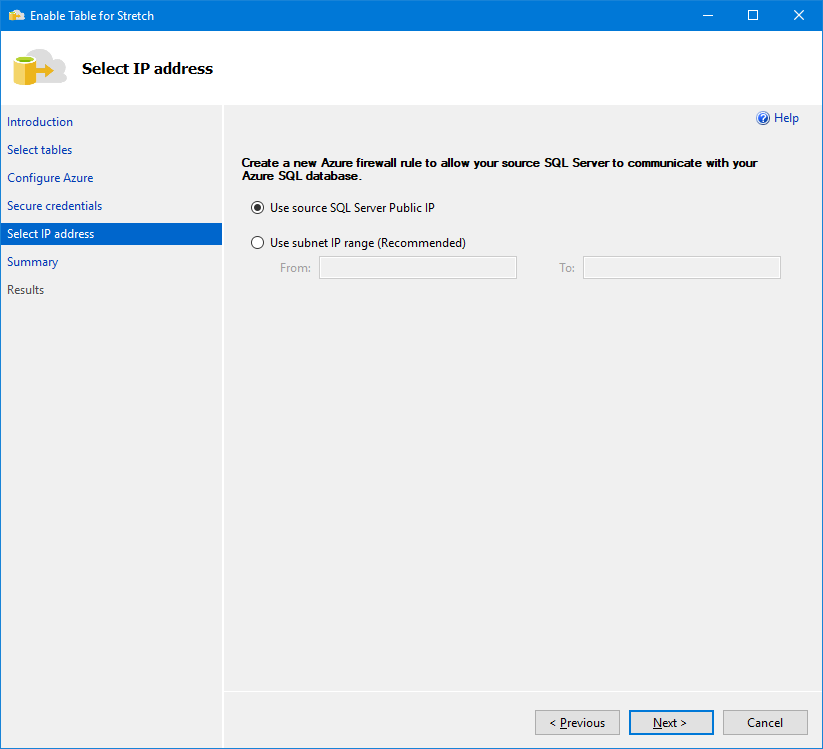
E aqui, podemos configurar o Firewall desse database, seja utilizando o seu IP atual ou fornecendo uma faixa de IP’s para permitir acesso. Essa configuração depende muito da sua rede, então pode ser alterada de acordo com o seu cenário. Caso você queira alterar essas configurações de firewall após a ativação do Stretch Database, isso pode ser feito através do Portal do Azure.
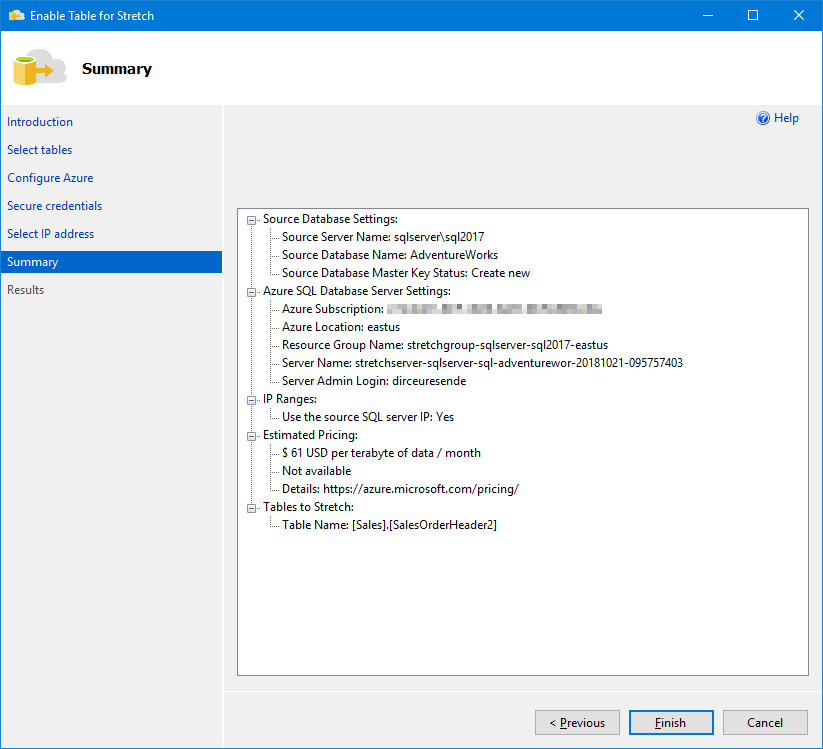
Resumo das ações que serão realizadas:
Migração dos dados realizada com sucesso! Agora é só esperar a migração dos dados finalizar em segundo-plano (background), de forma totalmente transparente. Para acompanhar o andamento da transferência dos dados, utilize a DMV sys.dm_db_rda_migration_status:

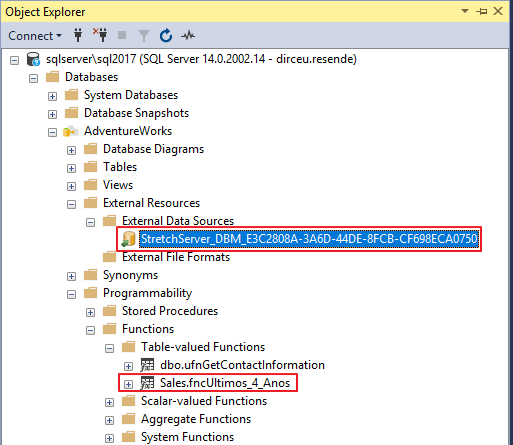
Notem que após criar o Stretch Database em pelo menos uma tabela, o ícone do database é alterado na tela do Object Explorer do SSMS.

Além disso, 2 novos objetos são criados: 1 External Data Source (Stretch Server) e 1 função de classificação (fncUltimos_4_Anos)
Demonstração em vídeo
Como implementar o Stretch Database utilizando Transact-SQL (T-SQL)
Visualizar conteúdoO operador Remote Query no plano de execução
Visualizar conteúdo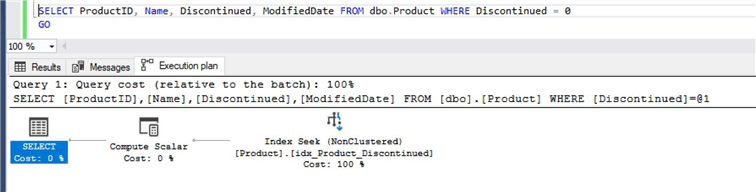
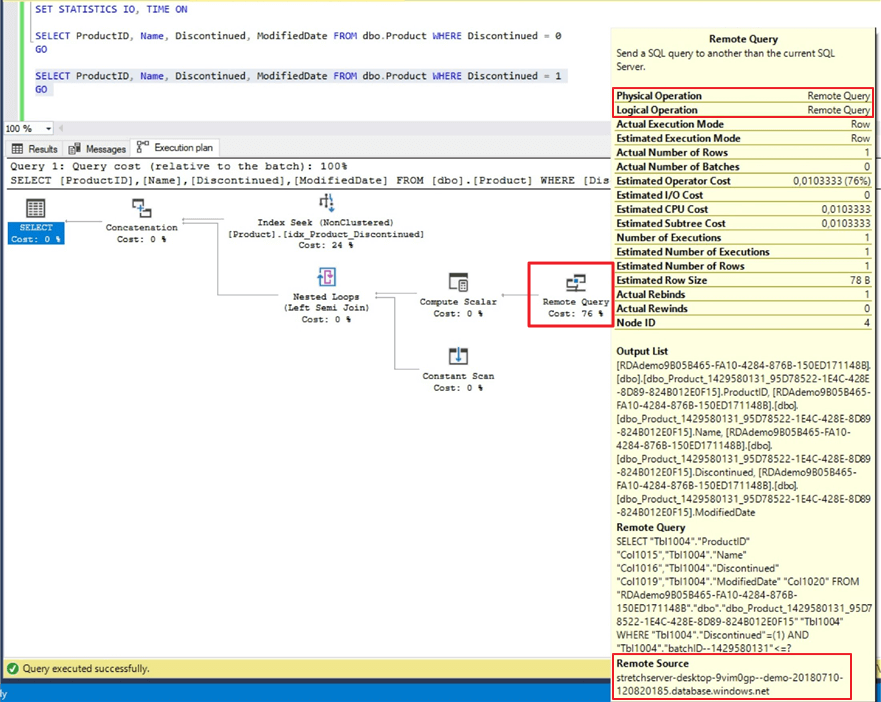
Entretanto, quando ativamos o Stretch nessa tabela, vemos que ao consultar os dados que estão no servidor remoto, o operador “Remote Query” passa a fazer parte do nosso plano de execução. Isso ocorre tanto quando você consulta a tabela inteira quanto quando você consulta dados que estão apenas no servidor remoto.
Caso o resultado da sua consulta esteja armazenado apenas localmente, o operador “Remote Query” não irá aparecer no plano de execução.
No caso do exemplo acima, foi utilizado a coluna “Discontinued” como filtro para determinar os dados que devem ser migrados ou não (1 = Migra, 0 = Permanece local), ou seja, caso não seja realizado nenhum filtro (trazendo a tabela toda) ou algum outro filtro que retorne dados com essa flag tanto com os valores 0 e 1 ou apenas o valor 1, o operador “Remote Query” estará presente, pois uma parte dos dados estará no servidor remoto.
Caso uma consulta retorne apenas os dados com essa flag = 0, o operador “Remote Query” não irá fazer parte do plano de execução, já que serão retornados apenas dados que estão na infra local.
Como pausar, desativar e resumir a migração dos dados no Stretch Database
Visualizar conteúdo
Como pausar a migração dos dados
Para pausar a migração dos dados, utilize o comando abaixo:
|
1 2 3 4 5 6 |
USE AdventureWorks GO ALTER TABLE SalesOrderHeader2 SET ( REMOTE_DATA_ARCHIVE ( MIGRATION_STATE = PAUSED ) ); GO |
Como resumir/continuar/remotar a migração dos dados
Para resumir/retomar/continuar a migração dos dados, utilize o comando abaixo:
|
1 2 3 4 5 6 |
USE AdventureWorks GO ALTER TABLE SalesOrderHeader2 SET ( REMOTE_DATA_ARCHIVE ( MIGRATION_STATE = OUTBOUND ) ); GO |
Como desativar a migração dos dados para uma tabela
Para desativar a migração dos dados e trazer os dados migrados para a nuvem de volta para a sua infraestrutura local (a cópia dos dados remotos para a tabela do Azure de volta para o SQL Server gera custos de transferência de dados), utilize o comando abaixo:
|
1 2 3 4 5 6 |
USE AdventureWorks GO ALTER TABLE SalesOrderHeader2 SET ( REMOTE_DATA_ARCHIVE ( MIGRATION_STATE = INBOUND ) ); GO |
Para desativar a migração dos dados e abandonar os migrados para a nuvem, utilize o comando abaixo:
|
1 2 3 4 5 6 7 8 |
USE AdventureWorks GO ALTER TABLE SalesOrderHeader2 REMOTE_DATA_ARCHIVE = OFF_WITHOUT_DATA_RECOVERY ( MIGRATION_STATE = PAUSED ) GO |
Lembre-se de Pausar a migração de dados em tabelas individuais quando quiser solucionar problemas no servidor local ou para maximizar a largura de banda de rede disponível. Além disso, desabilitar o Stretch Database de uma tabela ou de um banco de dados não exclui o objeto remoto. Se você quiser excluir a tabela remota ou o banco de dados remoto, descarte-o(a) usando o Portal de Gerenciamento do Azure. Os objetos remotos continuam incorrendo em custos do Azure até que você os exclua.
Como desativar o Stretch Database para um banco de dados
Para desativar o Stretch Database para um banco de dados, você precisará antes desativar o Stretch de todas as tabelas individuais que estão ativadas neste database. Utilize a view sys.remote_data_archive_tables para saber quais são essas tabelas.
Após desativar o Stretch de todas as tabelas, utilize o comando abaixo para desativar o Stretch do banco de dados:
|
1 2 3 |
ALTER DATABASE AdventureWorks SET REMOTE_DATA_ARCHIVE = OFF GO |
Lembre-se que desabilitar o Stretch Database de um banco de dados não exclui o banco de dados remoto. Se você quiser excluir o banco de dados remoto, descarte-o usando o Portal de Gerenciamento do Azure. O banco de dados remoto continua a gerar custos do Azure até você excluí-lo.
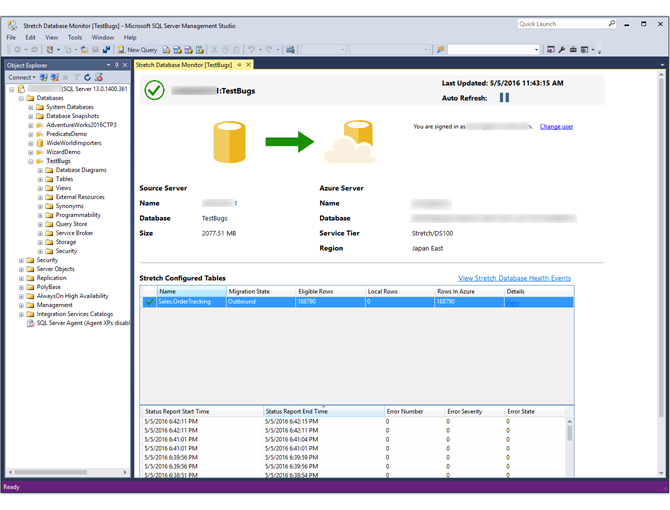
Como monitorar o andamento da migração dos dados no Stretch Database
Visualizar conteúdo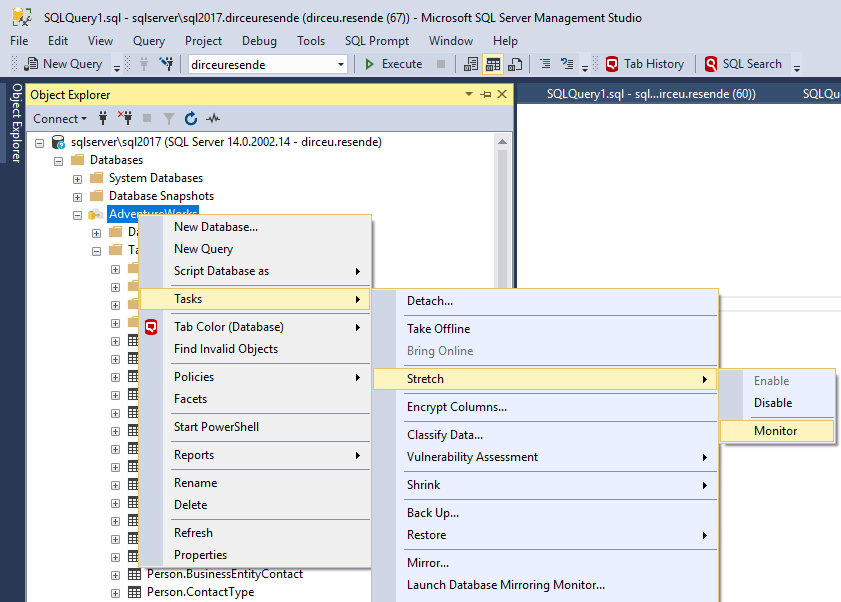
Dessa forma, será aberta um relatório onde você consegue visualizar detalhes da quantidade de linhas elegíveis para migração e quantas já foram migradas, bem como as cargas (lotes de até 9.999 registros) realizadas:
Uma forma de conseguir acompanhar o andamento da migração dos dados utilizando Transact-SQL (T-SQL), é consultando a view sys.dm_db_rda_migration_status, que vai retornar as informações de cada lote de carga:
Para consultar as informações de quais databases estão com Stretch Database habilitado, consulte a view sys.remote_data_archive_databases

ou a view sys.remote_data_archive_tables para consultar as tabelas que possuem o Stretch Database:

Backup e Restore de bases com Stretch Database
Visualizar conteúdoLimitações do Stretch Database
Visualizar conteúdoO preço do Stretch Database
Visualizar conteúdo
Como vocês podem ver na imagem, o custo estimado é de 61 dólares a cada Terabyte, por mês. Entretanto, essa estimativa é apenas em relação aos dados transferidos. Quando você cria um servidor do Stretch Database, você é cobrado por esse servidor também, e, ao contrário desse estimativa, não é nada barato. Percebi isso quando recebi um e-mail, 4 dias depois dos meus testes do Stretch Database, dizendo que eu já havia consumido meus 1.000 reais de crédito no Azure (sendo que não havia utilizado nada ainda).
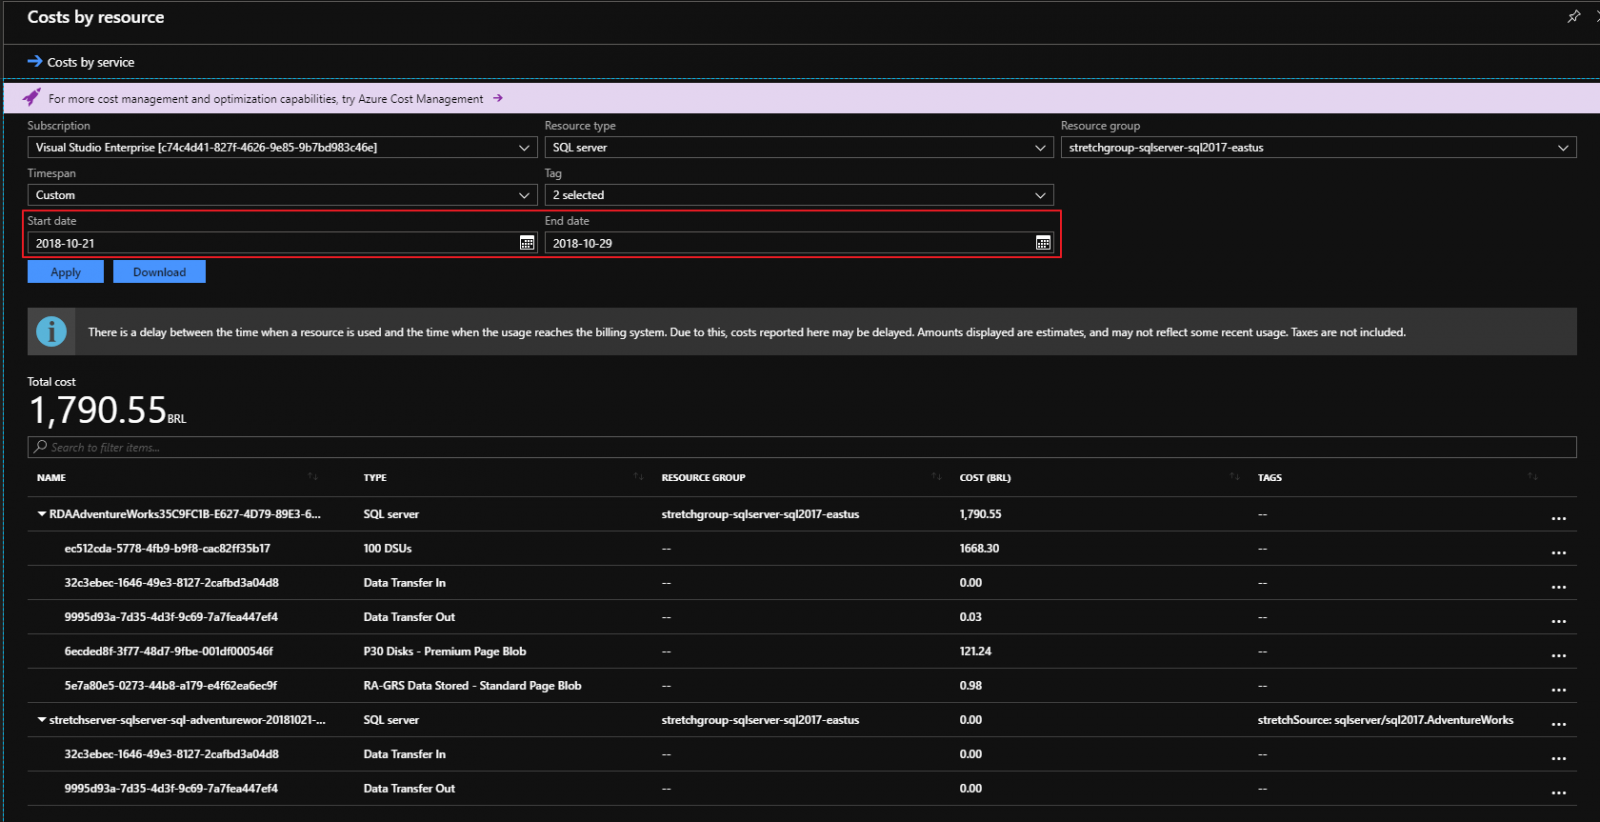
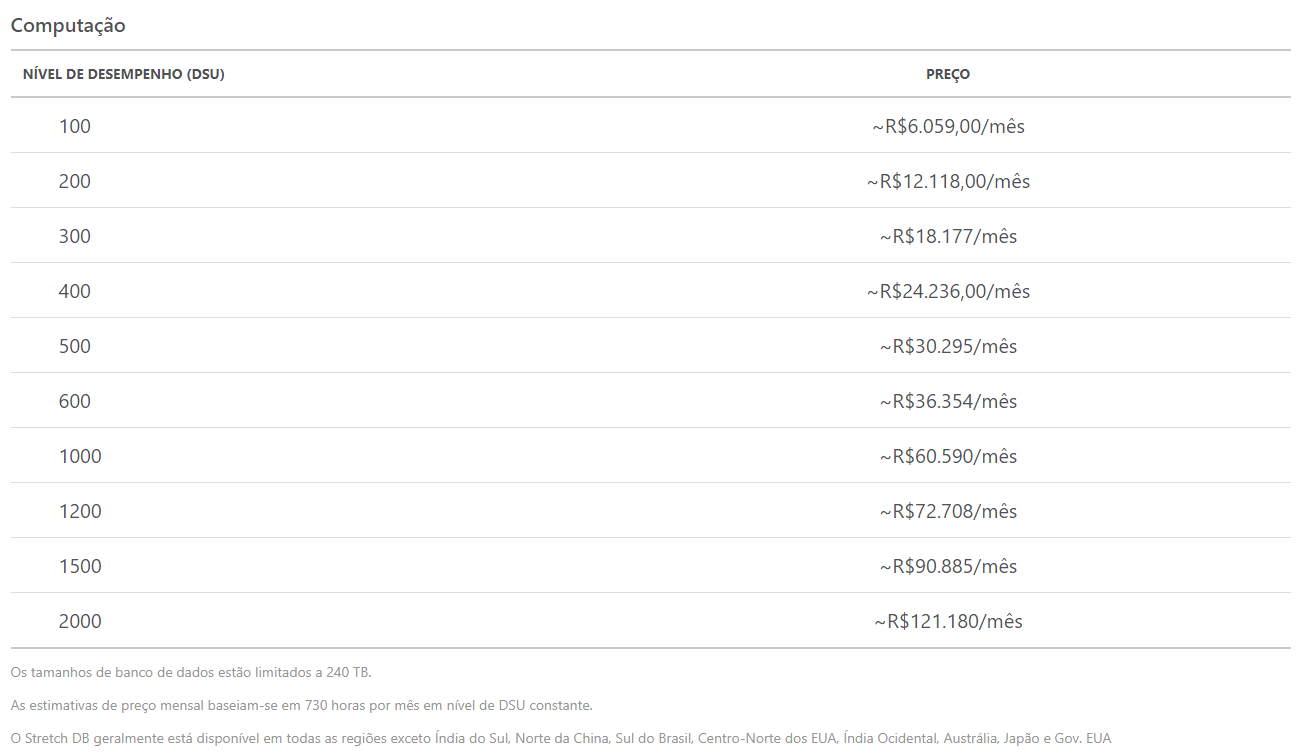
Após esse susto (kkkkk) acabei pesquisando melhor o preço desse recurso, que segue abaixo para que vocês fiquem cientes do custo desse serviço:
References
https://docs.microsoft.com/en-us/sql/sql-server/stretch-database/get-started-by-running-the-enable-database-for-stretch-wizard?view=sql-server-2017
https://docs.microsoft.com/en-us/sql/sql-server/stretch-database/limitations-for-stretch-database?view=sql-server-2017
https://docs.microsoft.com/en-us/sql/sql-server/stretch-database/pause-and-resume-data-migration-stretch-database?view=sql-server-2017
https://docs.microsoft.com/en-us/sql/sql-server/stretch-database/monitor-and-troubleshoot-data-migration-stretch-database?view=sql-server-2017
https://docs.microsoft.com/en-us/sql/sql-server/stretch-database/backup-stretch-enabled-databases-stretch-database?view=sql-server-2017
https://docs.microsoft.com/en-us/sql/sql-server/stretch-database/restore-stretch-enabled-databases-stretch-database?view=sql-server-2017
https://docs.microsoft.com/pt-br/sql/sql-server/stretch-database/enable-stretch-database-for-a-database?view=sql-server-2017
https://www.mssqltips.com/sqlservertip/5526/how-to-setup-and-use-a-sql-server-stretch-database/
And that's it, folks!
Espero que tenham gostado desse artigo e até a próxima!

Li que no SQL mais novo ele será descontinuado. Qual recurso poderemos usar agora? Qual a melhor forma de armazenar dados frios no SQL Server?
Dirceu, boa tarde.
Gostei muito do post.