Hey Guys!
Boa tarde!
Estava usando a minha VM para criar o meu post anterior (Como consultar informações de um CEP no SQL Server) e tive alguns problemas para acessar a internet.
O Problema
Sempre usei minhas VM’s com o modo de conexão NAT (Network Address Translation), que é o mais simples e fácil de todos de configurar, funciona bem e nunca tive dificuldade nenhuma com isso. O modo NAT permite que a sua máquina virtual se conecte à rede interna utilizando o IP da sua máquina física. Por este motivo que você não consegue ter mais de uma VM conectada à internet utilizando a conexão NAT.
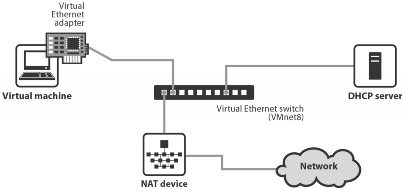
Como eu já estava com outra VM rodando antes de abrir essa, eu não estava conseguindo mais utilizar a rede e não queria ter que fechar a outra VM.
A Solução
A solução para esse problema é simples: Utilizar o modo Bridge do VMware Player, que permite uma conexão direta da sua VM com a internet, utilizando a sua placa de rede física e atribuindo um endereço de rede local exclusivo para a VM. Caso sua rede interna tenha o serviço de DHCP, ele mesmo se responsabilizará por fornecer um endereço de IP válido para a sua VM.
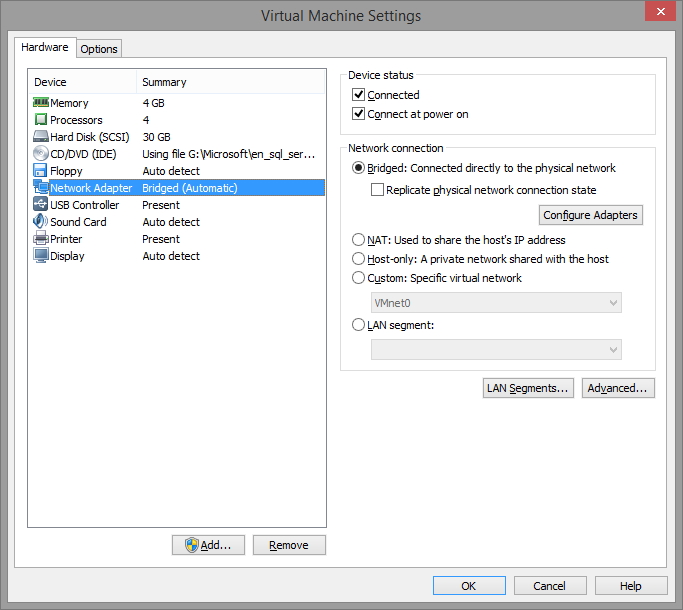
Com isso, a sua VM passa a ficar disponível para a sua rede como se fosse uma máquina física e você ainda tem a vantagem de conseguir acessar serviços que estão nessa VM como um banco de dados, por exemplo, através da máquina física ou outras máquinas da rede.
Complicações para a nossa solução
Após identificar o problema e já definir a solução, vamos implantá-la. Uma tarefa que parece simples, mas se provou o contrário.
Na minha máquina física, eu tenho vários adaptadores de rede:
– Conexão Local TAP-9 (VPN)
– Wi-Fi (Onde eu estou conectado à Internet)
– Ethernet (Conexão via Cabo de Rede – Desconectado)
– Adaptadores do VMWare
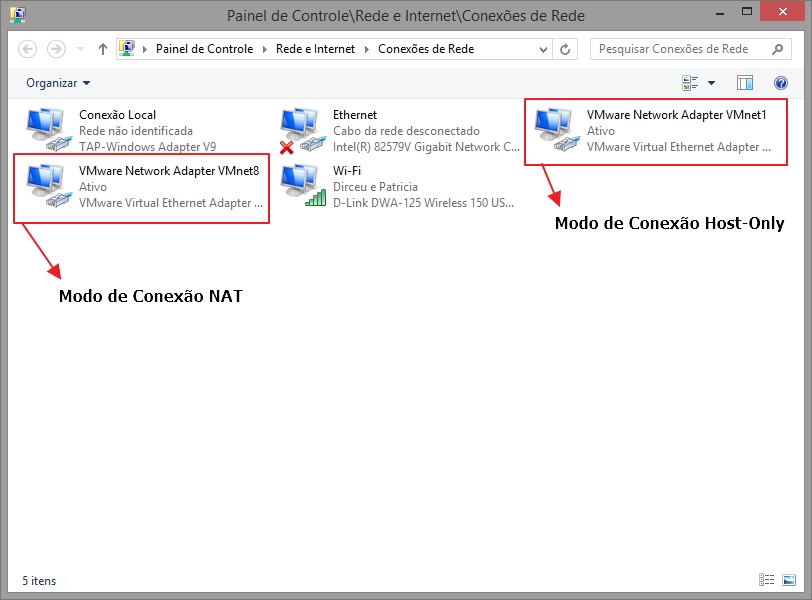
Repare que o VMware Player criou 2 adaptadores de rede para que ele se conecte:
– VMware Network Adapter VMnet1 para a conexão no modo Host-Only
– VMware Network Adapter VMnet8 para a conexão no modo NAT
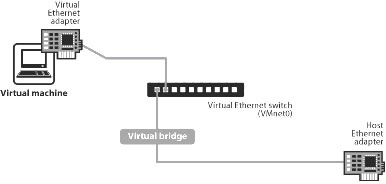
A interface utilizada pelo modo Bridge é a VMNet0, que não é física e sim virtual, onde ela é um apontamento para um adaptador físico de rede. O problema é que em ambientes com vários adaptadores, essa conexão virtual VMnet0 pode acabar apontando para um adaptador de rede que não possui conexão com a Internet e com isso, você não conseguirá utilizar sua VM no modo Bridge.
Pra dificultar um pouco mais nosso problema, a instalação do VMware Player NÃO VEM com o utilitário de configuração de rede virtual (Virtual Network Editor – vmnetcfg.exe).
Resolvendo as complicações e utilizando a VM em modo Bridge
O primeiro passo que devemos fazer, é copiar o utilitário de configuração de rede virtual para o diretório de instalação do VMware Player. Faça o download do arquivo vmnetcfg para VMware Player 7 e extraia na pasta de instalação do seu VMware Player.
Agora abra o arquivo extraído (vmnetcfg.exe) com privilégios de Administrador e você verá uma tela como essa:
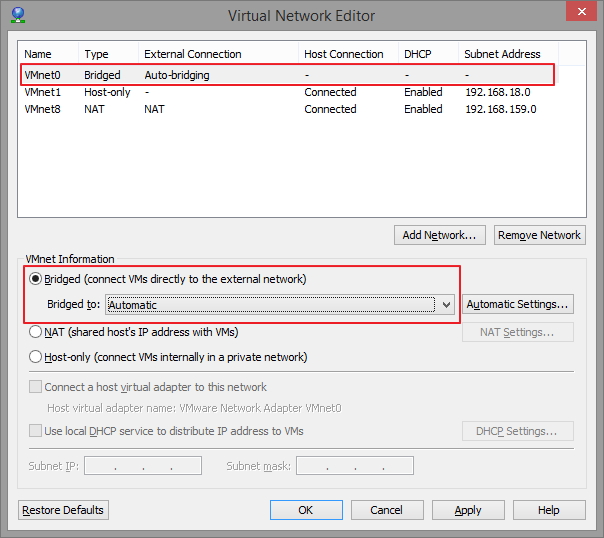
Como as configurações estão como automático, provavelmente está apontando para um adaptador sem conexão. Agora, vou alterar o apontamento para o adaptador de rede da minha máquina física que realmente está conectado à Internet:
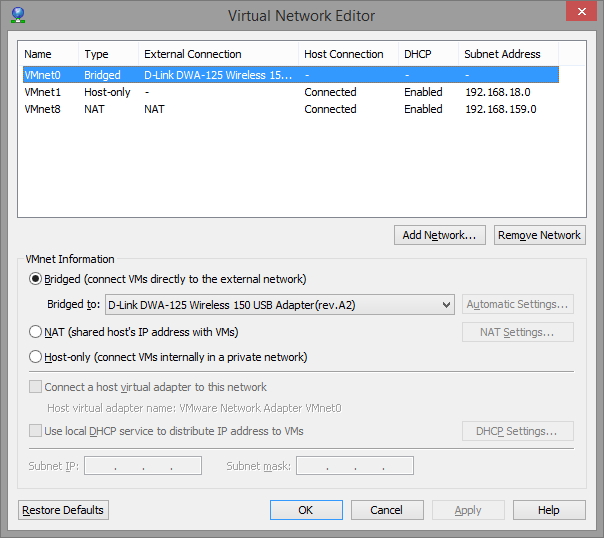
Após as alterações realizadas, é só reiniciar a VM que ela estará com acesso a rede e à internet!

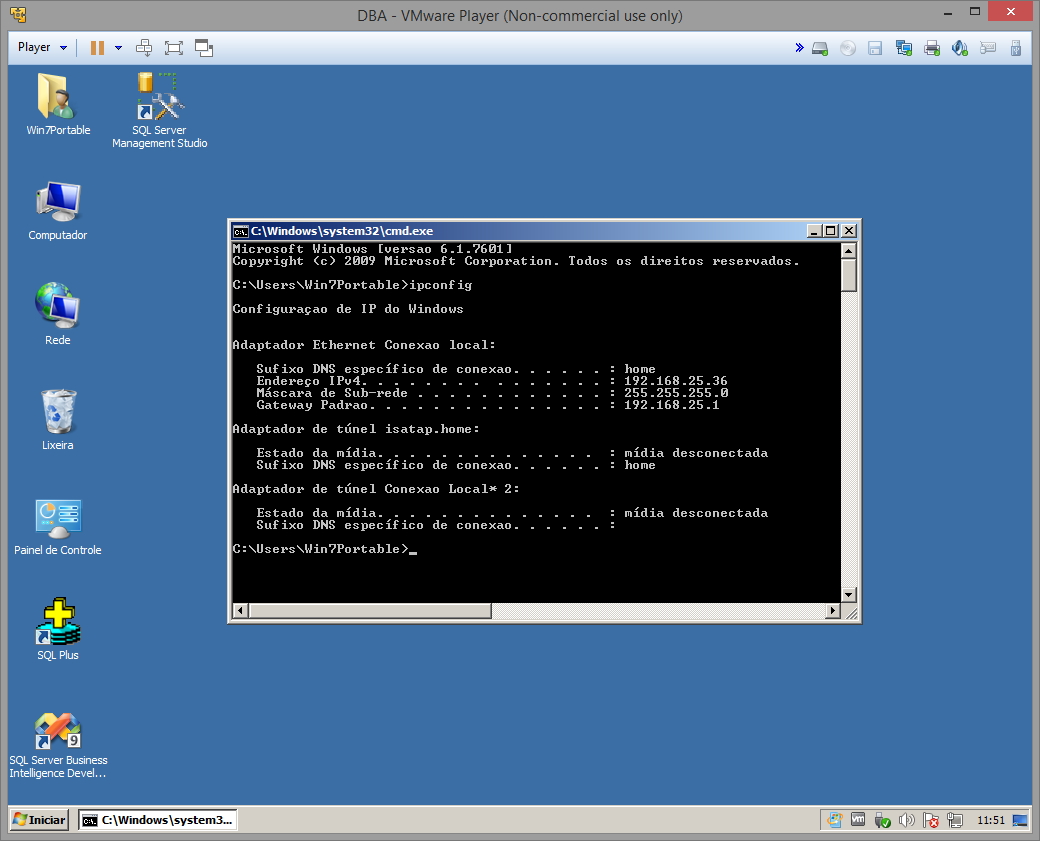
Configuração de IP em uma VM no modo de conexão Bridge:
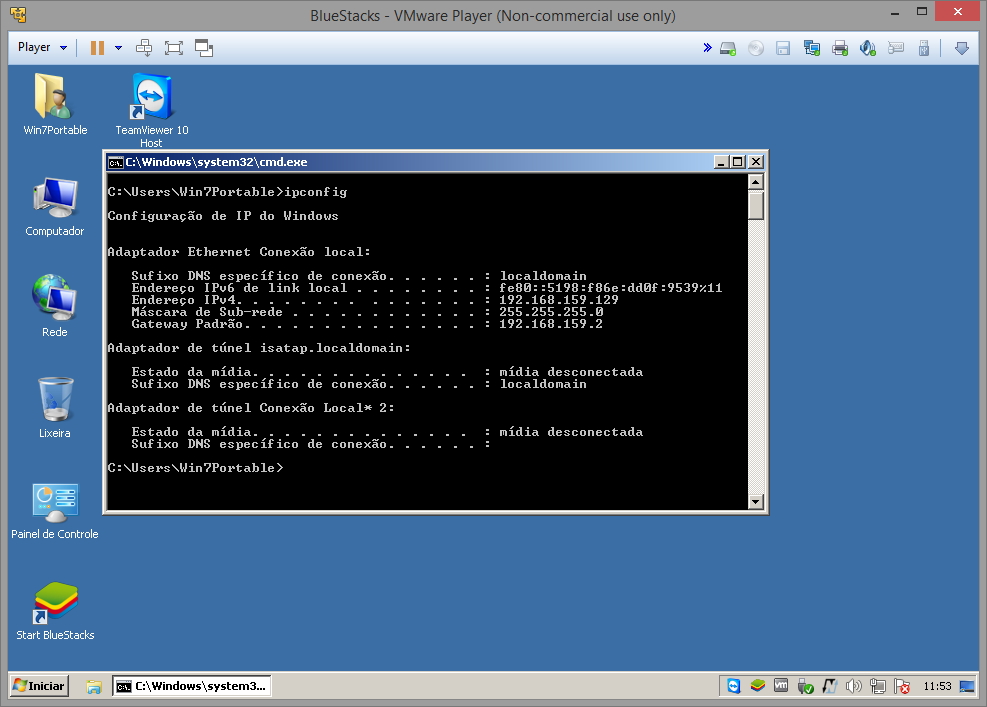
Configuração de IP em uma VM no modo de conexão NAT:
É isso, pessoal!
Espero que tenham gostado do post e até a próxima!
Se Você quer usar também o VMware Player (que é grátis), mas não sabe como ou está com dificuldades de instalar, acesse o post Criando uma máquina virtual com o VMware Player
UPDATE 22/03/2016:
vmnetcfg Para VMware Player 12.1.0

os Roteadores não ping de forma alguma, tanto nat quanto brigde, no windows Roda normal, porem no linux mint acontece isso
Muito obrigado Dirceu. Valeu pela informação.
Parabens em 2019 resolveu meu problema com esta dica top.
Obrigado, Hemerson! Espero que tenha gostado dessa dica
Sobre a REDE em MODO NAT que só funciona em uma VM de cada vez é mentira!
Print: (https://imagizer.imageshack.com/img921/891/BXBurG.png)
Olá Mark47,
Tudo bem?
Primeiramente, obrigado pela sua visita aqui no meu blog, que é focado para BANCO DE DADOS e eventualmente, algum outro conhecimento que eu ache útil compartilhar.
Não sei se você reparou, mas eu utilizo o VMWare Player durante todo o meu post, e você está utilizando o Oracle VirtualBox para querer provar seu argumento. Isso seria tão certo quanto falar que carro manual não precisa trocar de marcha e utilizar um carro automático para provar sua teoria.. kkkkkkkk
O segundo ponto é que você disse que eu estava mentindo ao falar que o VMware Player não suportava duas conexões no modo NAT. Nesse caso, peço que você reveja a sua forma de falar, porque podem ocorrer equívocos e informações erradas quando você tem um blog com mais de 370 artigos publicados, ainda mais quando não é sua especialidade e você quer criar um artigo pra ajudar as pessoas. Esse seu comentário foi totalmente desnecessário, até porque, o foco do artigo nem era voltado para o modo NAT e sim, o Bridge.
Como você não deve ter blog e nem experiêncoa em compartilhar conhecimento com outras pessoa, talvez você não saiba que essas coisas podem acontecer (o que eu ainda acho que realmente o software do artigo tenha essa limitação) e por isso, tem essa atitude tão agressiva com quem quer apenas ajudar.
Um grande abraço e até mais.
Oi Andre Andrade, não faço sei que já faz algum tempo que você postou sua dúvida no canal, e hoje eu acessei este tutorial e foi tudo que eu precisava cara, deu tudo certo, no meu caso o servidor é web, fiz para a minha agência para que o pessoa trabalhassem em server local e toda customização é feita neste servidor.
Então, no meu caso e edito o arquivo hosts do windos c:\\windows\system32\drivers\etc\hosts
Veja exemplo – apenas comoe exemplo
192.168.2.134 siteteste.com.br
Quanto faço o arquivo host resolve o nome (siteteste.com.br) para o IP 192.168.2.134, se eu digitar nome navegador siteteste.com.br eu acesso a página em questão, mas neste caso o meu servidor é web, e já tem configurações no server também.
abraço.
Boa Noite
Segue todos os passos acima é deu tudo certo , porém quando vou acessar na minha máquina fisica o serviço FTP pelo browser não dá certo , porém eu consigo pingar o IP da minha máquina virtual na minha máquina fisica. O serviço está tudo ok na VM acesso ela é tudo pelo browser dela.
Observação : a VM está em modo bridge e com o firewall desativado
Mais ainda não consigo acessar na minha máquina fisica !
Obrigado!
Porém o firewall do Avast está bloqueando o acesso, só funciona com ele desabilitado!
Tem alguma dica para isso?
Aqui funcionou certinho ?
Boa tarde Dirceu
Eu estou com uma dúvida/problema, preciso criar um laboratório em plataforma windows onde preciso de um DNS server, nesse mesmo DNS um AD e em outro servidor vou criar uma ac microfosot, como faço para criar o DNS em vmplayer com IP estático? e não DHcp? obrigaado
Eu não consegui alterar a configuração para bridged, apresenta esse erro: cannot change netword to bridged:there are no un dridged host netword adapters
Raynã, dá uma olhada nesse link aqui: https://kb.vmware.com/selfservice/microsites/search.do?language=en_US&cmd=displayKC&externalId=2005168
Se não resolver, me fala que eu tento te ajudar.
Opa, eu tentei aqui e aparece o seguinte erro “Nao foi possivel localizar o ponto de entrada do procedimeento Unicode_Free na biblioteca de vínculo dinamico c:[pasta em que o vm está]. Ja executei com adm e tals e nada. Sabe o que pode ser?
Muito Obrigado! VWP 12 🙂
Parabens pelo post!
Estou com um problema numa simulaçao utilizando o GNS3 com duas maquinas virtuais criadas no Vmware.
A primeira está configurada como NAT (vmnet8) e com ela consigo ter conexao e mandar pacotes.
A outra está configurada como Host-Only(Vmnet1) e nao consigo ter conexao com ela.
O que posso fazer pra ter conexao nas duas maquinas?
Obrigado
Parabéns pelo post!
Estou com um problema na utilização de duas VMs pelo VMware com o GNS3.
Em uma delas(vmnet8) é utilizada o NAT e na simulacao consigo ter conexão e enviar pacotes. Já na outra(vmnet1) é utilizado o host-only e nessa máquina virtual não tem conexao.
Você tem alguma solução pra esse caso ?
Obrigado
Desse jeito eu não consegui pois não sabia como chamar esse executável de dentro do meu vmware 10, mas achei isto https://www.youtube.com/watch?v=CWqZg25YUTY e resolvi todos meus problemas pois indo no menu Edit, encontrei o virtual network editor que é este mesmo programinha ai que já vem no meu VMware! Além disto esse vídeo ensina a instalar um protocolo bridge na conexão do host que eu não estava conseguindo instalar até procurar no próprio diretório do vmware e deu tudo certo!
Alexandro,
Boa noite!
Provavelmente você usa o VMware Workstation, que é a versão paga do VMware e já vem com o Virtual Network Editor. Nesse post eu expliquei como utilizar esse aplicativo no VMware Player, que é grátis para uso não-comercial e não possui o Virtual Network Editor.
Esse executável você não executa dentro da VM e sim na máquina física mesmo (host), pois ele é que configura qual o adaptador de rede físico que a VM irá acessar para se conectar à rede.
Qualquer dúvida, estou à disposição.
Boa noite eu baixei arquivo que vc falou..extraio da pasta tento instalar mas apresenta o seguinte erro…..
“O programa nao pode ser iniciado porque esta faltando
sigc-2.0.dll no seu computador. Tente reinstala-lo para resolver esse problema.” que arquivo e esse?
Larissa,
Boa noite!
Esse problema está acontecendo, pois você não extraiu o arquivo para o diretório onde seu VMware foi instalado 😉
Me ajudou bastante! Obrigado
fala ai amigo estou tentando abrir um servidor ‘ na maquia virtual no vbox ‘ e nao estar dando pra colocar o modo bridge ..
Muito informativo! 🙂 Adorei o Blog
Boa tarde,
Sucesso aqui, já estava quase desistindo.
Obrigado por compartilhar conhecimento.
Até mais.
Obrigado pela visita!