Hey guys!
Nesse post eu gostaria de compartilhar com vocês como criar e gerenciar usuários e logins. Explicarei o que é o usuário/grupo Azure Active Directory admin, o que é o server admin, como criar e quais as diferenças entre um login criado na instância e um usuário criado no database.
Vale lembrar que a interface do Management Studio ainda não suporta criação de logins e usuários, então isso deve ser feito via comandos T-SQL.
Métodos de autenticação
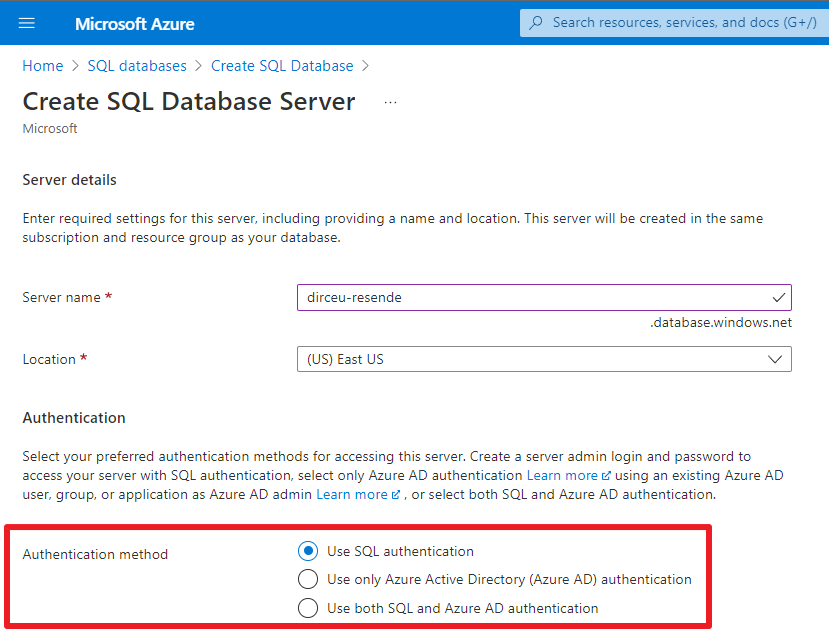
Clique aqui para visualizar o conteúdoIsso irá definir se o seu servidor irá aceitar conexões utilizando o Azure Active Directory (Azure AD) apenas, se vai aceitar apenas conexões utilização autenticação SQL ou se vai aceitar as duas formas de autenticação.
A forma mais segura e a recomendação oficial da Microsoft, é utilizar a opção de aceitar apenas autenticação Azure Active Directory (Azure AD), uma vez que a responsabilidade pela gestão das senhas e credenciais passa a ser do Azure Active Directory e não do banco de dados. Além disso, você pode definir autenticação de 2 fatores, por exemplo, exigindo que o usuário precise confirmar o login em um dispositivo externo, como o celular ou e-mail.
Usuários com autenticação SQL também são passíveis de ataques de força bruta, visto que o banco de dados não irá monitorar e bloquear excessivas tentativas de falhas de conexão por padrão, enquanto o Azure AD tem esse bloqueio por padrão, relatórios sobre falhas de conexão, Inteligência Artifical analisando todos os logins e bloquando logins suspeitos, etc..
Outro ponto positivo para essa escolha é que caso essa pessoa saia da empresa, basta desativar o seu login no Azure Active Directory e ela automaticamente já perde acesso em todos os bancos. Utilizando uma autenticação SQL, você terá que entrar banco por banco, verificar se esse usuário tinha acesso, e excluir/desativar essa conta.
Entretanto, sabemos que nem sempre é possível bloquear a autenticação utilizando credenciais SQL, especialmente quando falamos sobre sistemas legados, algumas ferramentas de BI ou alguns tipos de integrações. Nesses casos, a autenticação SQL acaba sendo necessário. Caso não seja o seu caso, sugiro manter apenas a autenticação utilizando Azure AD.
Dependendo do método de autenticação escolhido, as opções de Azure Active Directory admin e Server admin são mostradas/ocultadas.
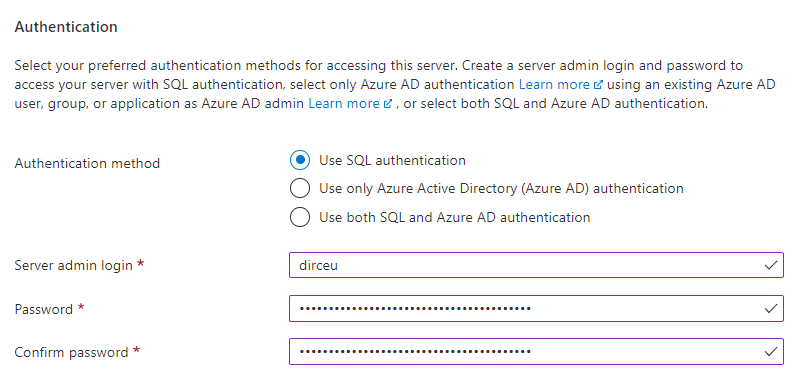
Use SQL authentication
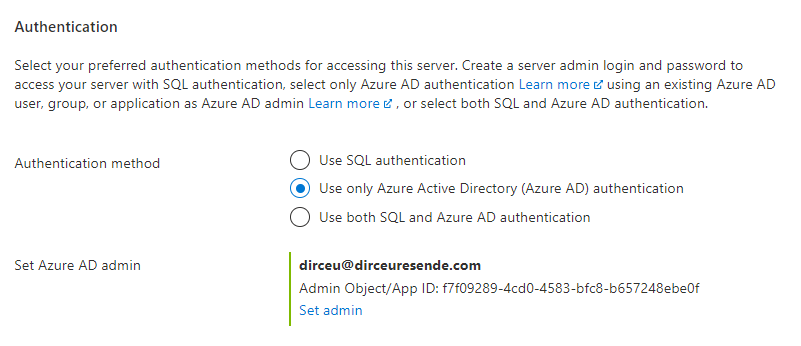
Use only Azure Active Directory (Azure AD) authentication
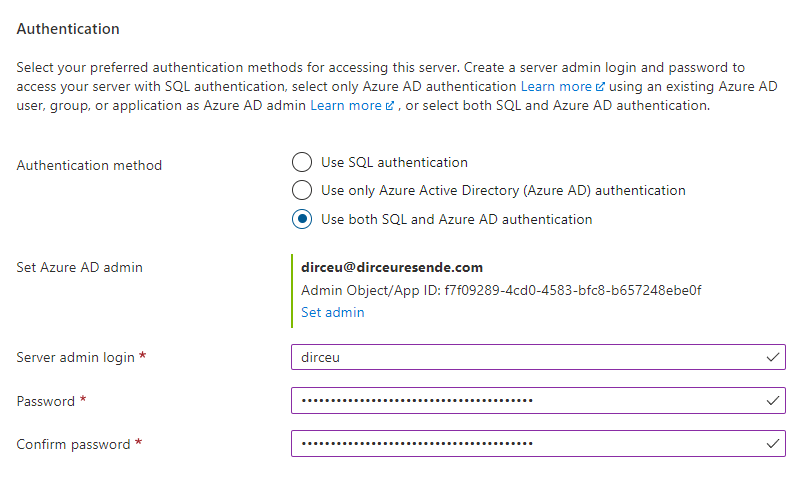
Use both SQL and Azure AD authentication
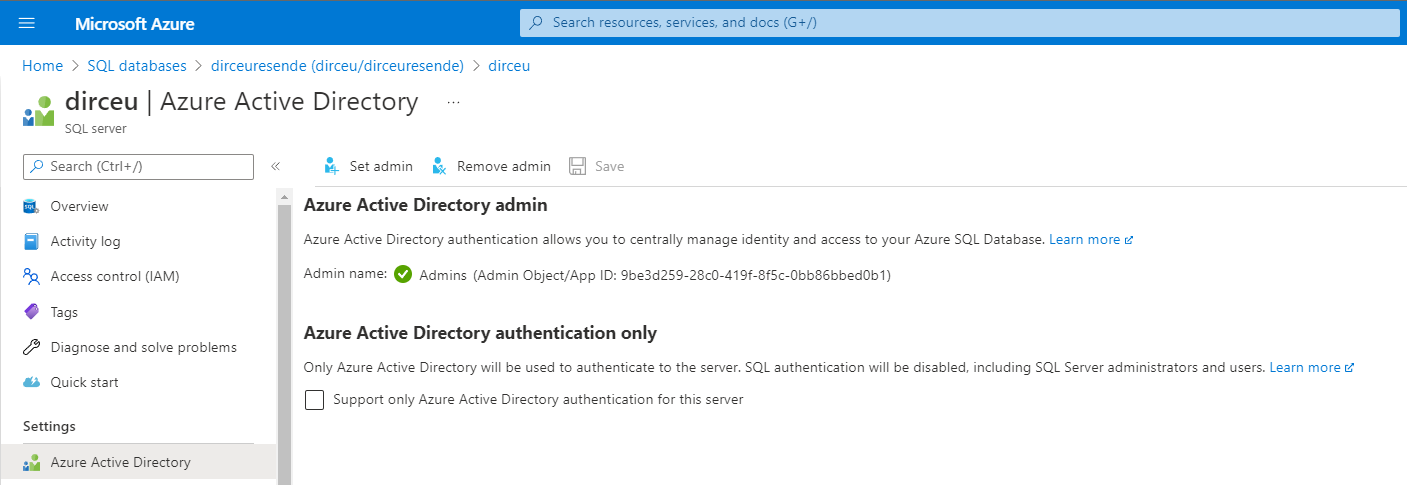
Azure Active Directory admin
Clique aqui para visualizar o conteúdo
Esse usuário ou grupo terá acesso irrestrito nos bancos de dados do servidor, com permissão para gestão dos usuários/logins, de todos os databases e acesso irrestrito aos dados também, podendo ser utilizado para conectar no banco de dados.
O usuário atribuído como Azure Active Directory admin não consegue alterar nenhuma propriedade do servidor pelo Portal do Azure (caso ela não tenha outras permissões no recurso e/ou na Subscription/Resource Group) e nem alterar o usuário admin. Somente com essa atribuição, ele não conseguirá nem abrir ou visualizar o recurso pelo Portal.
Suas permissões são apenas ao nível da instância, conectado ao banco de dados. A partir do momento que esse usuário se conecta, ele terá acesso a fazer tudo que seja possível fazer utilizando T-SQL.
Algumas configurações como Firewall, Service Tier e criação de outros bancos de dados, esse usuário pode fazer utilizando comandos T-SQL, mas não consegue fazer pelo portal do Azure.
Vale lembrar que apenas UM usuário pode ser atribuído a ser Azure Active Directory admin. Caso você queira ter mais de uma pessoa com esse nível de acesso, crie um grupo, adicione os usuários nesse grupo e atribua esse grupo como o Azure Active Directory admin.
Alerta: O usuário/grupo que seja o Azure Active Directory admin tem acesso automaticamente no banco de dados.
Depois que o servidor foi criado, você ainda pode ativar/desativar a autenticação via Azure Active Directory (Azure AD) e também gerenciar o usuário administrador.
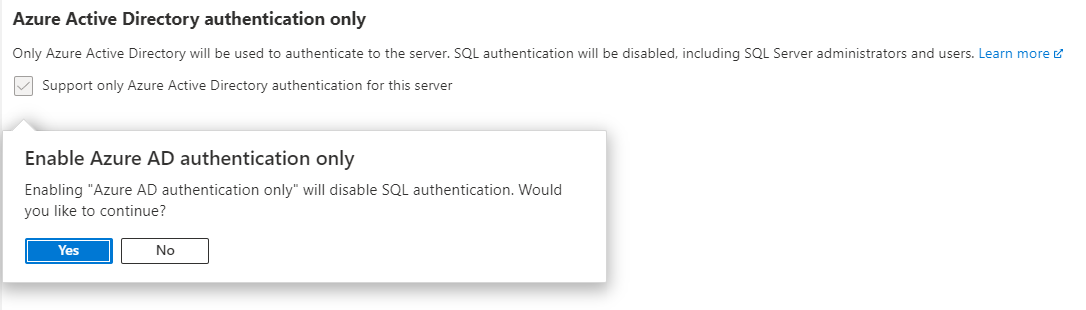
Se você tentar ativar a opção “Azure Active Directory authentication only”, para permitir somente autenticação usando o Azure AD, você verá uma confirmação perguntando se você realmente quer ativar essa opção, porque ela irá DESATIVAR a autenticação SQL e todos os usuários que utilizem esse tipo de autenticação, incluindo o usuário “sa” (Server admin)
Server admin (sa)
Clique aqui para visualizar o conteúdoIsso quer dizer que esse usuário não tem acesso nenhum no portal do Azure e não consegue alterar nada lá e nem alterar nenhuma propriedade. Entretanto, ele pode ser utilizado para logar na instância e ele terá acesso a todos os dados, de todas as tabelas, além de poder alterar/criar/excluir qualquer usuário, login, permissão ou objeto no banco, além de gerenciar database e server firewall via comandos T-SQL.
Como eu já comentei nesse post, essa alternativa é a menos segura possível, visto que quem fica responsável pela gestão das senhas e usuários é o banco de dados. Não tem suporte à MFA e cada usuário pode ter uma senha diferente, em bancos diferentes.
Caso você queira desativar o mesmo usuário em vários bancos, terá que entrar em banco por banco para desativar/excluir a conta (ou criar um script para automatizar isso), ao invés de simplesmente desativar a conta no AD.
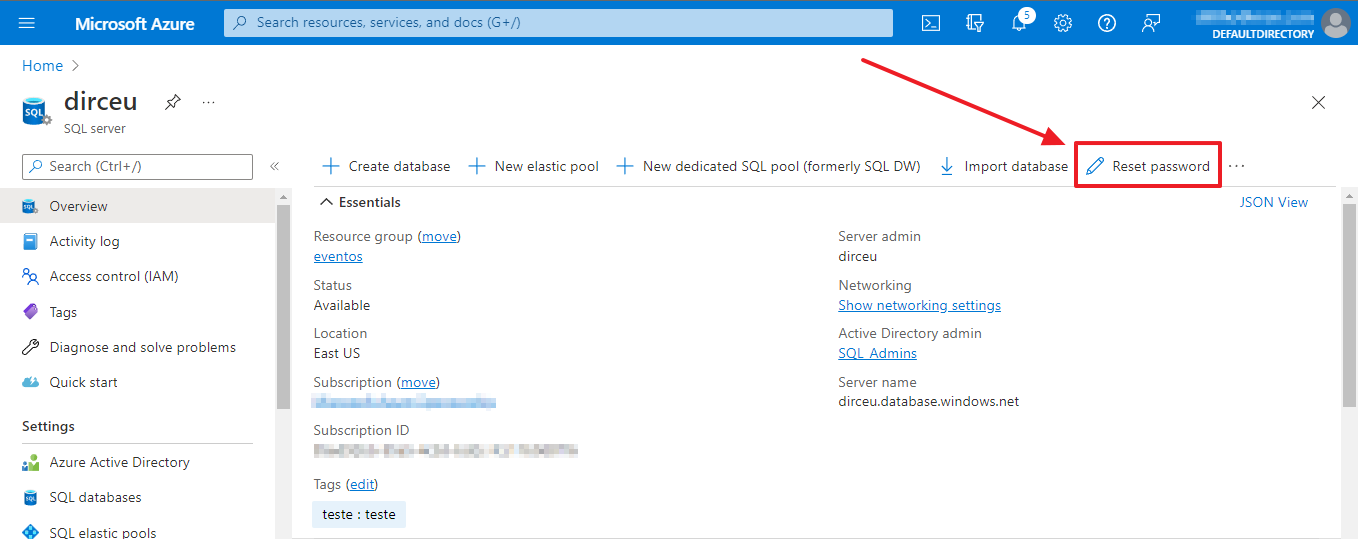
Não é possível alterar o nome do Server admin depois que o servidor é criado, mas é possível fazer um reset de senha, caso necessário
Esse usuário está disponível apenas se você selecionar o método de autenticação “Use SQL authentication” ou “Use both SQL and Azure AD authentication”.
Caso você tenha escolhido essas opções e depois tenha alterado o método de autenticação e depois altere para permitir apenas autenticação com Azure Active Directory, esse usuário será desativado, assim como todos os outros que utilizem autenticação SQL.
Criação de Logins
Clique aqui para visualizar o conteúdoO login é uma forma de conectar no banco, onde o banco inicial será o “master” e depois ele pode alterar o contexto para o banco desejado. Além disso, o login pode ser adicionado à alguma server role para receber permissões a nível de servidor.
Criando um login com autenticação SQL
Simples. Rápido. Prático. Inseguro. E mais um usuário que você terá que manter a senha atualizada, trocando de tempos em tempos (e alterando nas apps), se preocupando com tentativas de ataque por força bruta, vazamentos de senha, etc.
Para criar um login com autenticação SQL, basta seguir o script abaixo:
|
1 2 3 4 5 |
USE [master] GO CREATE LOGIN [dirceuresende] WITH PASSWORD = 'zlg*I1MoPZ^Xk8TNCNs%' |
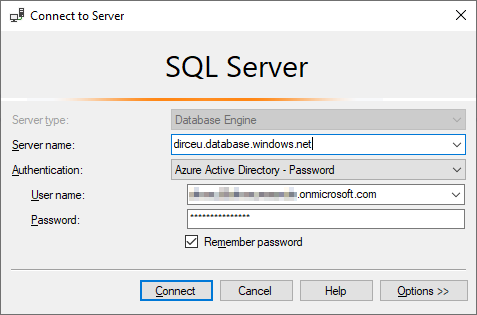
Criando um login com autenticação Azure Active Directory
O primeiro passo para isso, é acessar o Azure Active Directory para obter o “User Principal Name” (UPN) do login que quero adicionar no banco:
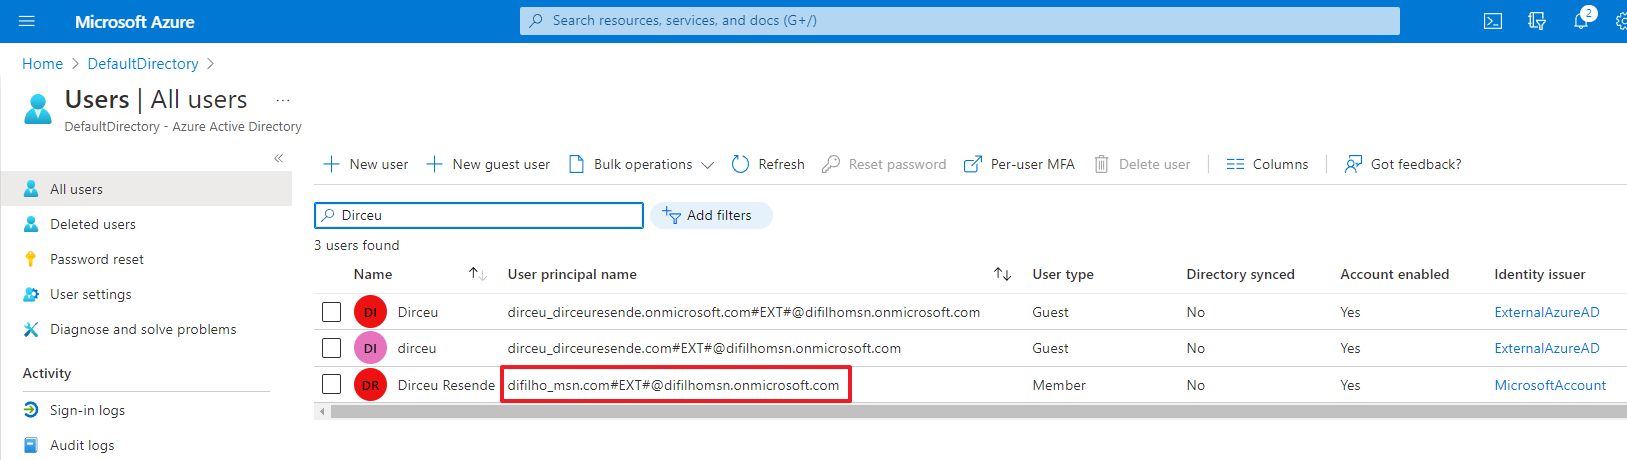
Agora que já sei o User Principal Name, já posso criar o login no banco “master”
|
1 2 3 4 5 |
USE [master] GO CREATE LOGIN [difilho_msn.com#EXT#@difilhomsn.onmicrosoft.com] FROM EXTERNAL PROVIDER |
Reparem que não precisei definir nenhuma senha para o login. A senha será a própria senha do Azure Active Directory, um único local centralizado para gestão de usuários e senhas.
Dica: Se você for utilizar autenticação SQL, sugiro utilizar sites geradores de senhas, como o LastPass e escolher uma senha bem complexa (eu costumo utilizar 50+ caracteres)
Criação de Usuários
Clique aqui para visualizar o conteúdoListo abaixo as diferenças entre Login e Usuário:
| Login | Usuário |
|---|---|
| Criado no banco "master" | Criado no banco onde ele irá se conectar |
| A conexão é feita sem precisar especificar o banco de dados | A conexão é feita obrigatoriamente tendo que especificar o banco de dados |
| Login pode receber permissões a nível de servidor (através de server roles) | Usuário NÃO pode receber permissões a nível de servidor |
| Login NÃO pode receber permissões em um banco de dados | Usuário pode receber permissões em um banco de dados |
| Login NÃO pode acessar nenhum banco de dados | Usuário pode acessar os bancos de dados que ele tem acesso, mesmo que não esteja associado a um login |
| Login precisa estar associado à um usuário para acessar algum banco de dados | Usuário NÃO precisa ser associado à um login (É até melhor que não seja) |
Se você optar por criar o login e depois criar um usuário associado à um login, a autenticação será feita via login, sem precisar especificar o nome do banco de dados. Ao se conectar ao servidor, essa pessoa irá visualizar todos os bancos de dados, tornando mais fácil um possível ataque.
Criando um usuário utilizando autenticação SQL
Como já comentei anteriormente, essa opção é a menos segura, mas é a mais simples, prática e fácil de usar, especialmente se estiver usando sistemas legados ou aplicações que não suportam conexão usando o Azure Active Directory.
|
1 2 3 4 5 6 7 8 9 10 11 12 13 14 |
-- Crio o usuário no banco desejado CREATE USER [dirceuresende] WITH PASSWORD = 'sd9s8d98asd989*(334' GO -- Adiciono o usuário na role "db_datareader", -- para ter acesso de leitura em todas as tabelas ALTER ROLE [db_datareader] ADD MEMBER [dirceuresende] GO -- Libero a permissão de "EXECUTE" -- em todos os objetos do banco GRANT EXECUTE TO [dirceuresende] GO |
Criando um usuário associado a um login
Nesse cenário, já existe um login previamente criado, seja utilizando autenticação SQL ou Azure Active Directory e vou agora criar um usuário no banco de dados desejado, utilizando esse login já existente. Nesse caso, não especificarei uma senha na criação do usuário, pois ele irá aproveitar o método de autenticação do login.
|
1 2 3 4 5 6 7 8 9 10 11 12 13 14 15 16 17 18 19 20 21 22 23 24 |
/* Crio o usuário "dirceuresende" usando o login "dirceuresende" no banco desejado */ CREATE USER [dirceuresende] FOR LOGIN [dirceuresende] -- Sem senha (vai usar a autenticação do login) /* Adiciono o usuário na role "db_datareader", para ter acesso de leitura em todas as tabelas */ ALTER ROLE [db_datareader] ADD MEMBER [dirceuresende] GO /* Libero a permissão de "EXECUTE" em todos os objetos do banco */ GRANT EXECUTE TO [dirceuresende] GO |
Criando um usuário utilizando o Azure Active Directory (Azure AD)
Assim como na criação do login, o primeiro passo para a criação de um usuário utilizando o Azure Active Directory (Azure AD), é acessar o Azure Active Directory para obter o “User Principal Name” (UPN) do usuário que quero adicionar no banco:
Agora que já sei o User Principal Name, já posso criar o usuário no banco desejado
|
1 2 3 4 5 6 7 8 9 10 11 12 13 14 15 16 17 18 19 20 |
-- Crio o usuário vindo do Azure Active Directory no banco desejado CREATE USER [difilho_msn.com#EXT#@difilhomsn.onmicrosoft.com] FOR EXTERNAL PROVIDER -- Aqui pode usar FROM/FOR EXTERNAL PROVIDER /* Adiciono o usuário na role "db_datareader", para ter acesso de leitura em todas as tabelas */ ALTER ROLE [db_datareader] ADD MEMBER [difilho_msn.com#EXT#@difilhomsn.onmicrosoft.com] GO /* Libero a permissão de "EXECUTE" em todos os objetos do banco */ GRANT EXECUTE TO [difilho_msn.com#EXT#@difilhomsn.onmicrosoft.com] GO |
Criando um usuário para um Azure Data Factory (Managed Identity)
Sempre que possível, opte por utilizar autenticação “Managed Identity” na sua aplicação ou recurso do Azure. Isso faz com que você precise apenas criar o usuário no banco, sem ter que informar nenhum usuário, senha ou KeyVault para acessar o banco de dados. Para criar o login/usuário no banco, é da mesma forma que qualquer outro login/usuário com autenticação Azure AD, com a diferença que você informará o nome do recurso ao invés do User Principal Name.
Exemplo prático
Tenho um recurso do Azure Data Factory e quero adicioná-lo no banco de dados para ele ter acesso para ler e modificar dados e estruturas.
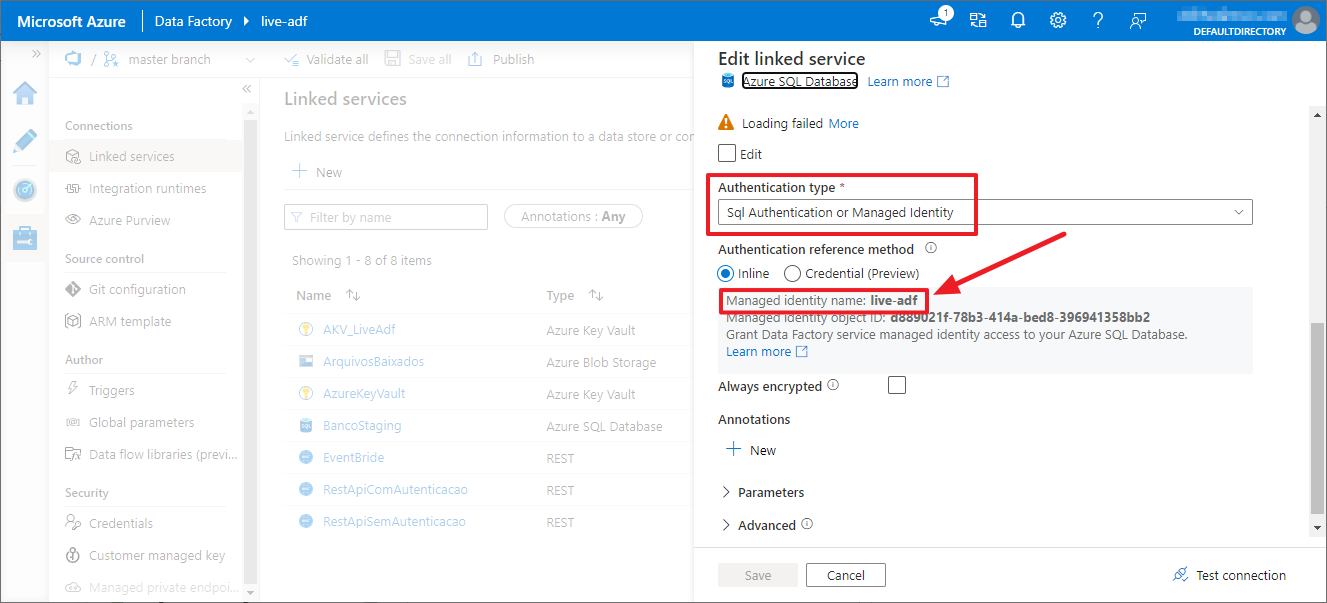
Adicionarei o nome do recurso agora como usuário (fica a seu critério entre login ou usuário) no banco de dados
|
1 2 3 4 5 6 7 8 9 10 11 |
-- Crio o usuário com o nome do recurso do Azure Data Factory CREATE USER [live-adf] -- Mesmo nome do recurso, conforme destaquei no print anterior FOR EXTERNAL PROVIDER -- Adiciono as permissões necessárias ALTER ROLE [db_datareader] ADD MEMBER [live-adf] ALTER ROLE [db_datawriter] ADD MEMBER [live-adf] ALTER ROLE [db_ddladmin] ADD MEMBER [live-adf] GRANT EXECUTE TO [live-adf] GO |
Result:

Criando um usuário para um App Registration / Service Principal
Para a criação de um usuário para um App Registration / Service Principal utilizando Managed Identity, o processo é o mesmo, basta informar o nome do AppRegistration e adicionar normalmente no banco de dados.
Exemplo:

Script para adicionar esse Service Principal no banco de dados
|
1 2 |
CREATE USER [AppRegistration_DirceuResende] FOR EXTERNAL PROVIDER |
Outra Dica: Precisa de ajuda para implementar Managed Identity na sua aplicação? Dê uma lida no artigo Passwordless connection string to Azure SQL database using Azure managed identity
And that's it, folks!
Espero que tenham gostado desse artigo e até a próxima!
Obrigado meu caro, estava procurando um conteúdo assim: Simples e direto. Obrigado!